Using a named filter in Panel Manager
Panel Manager provides tools for managing the panellists held in the database. Panellists must be selected using a filter. Named filters allow you to define a set of conditions based on the panellist profile and activity variables. Activity variables contain data about contact history, event history and email history.
Named filters created in Panel Manager may also be used in the CrossTab tool, and vice-versa.
The method for defining a named filter is similar to that used for defining filters within Sample Manager, however, custom filters are not yet available within Panel Manager.
From the Panel Manager screen select Filter from the toolbar to show the Filter view. Select the Named Filter radio button.

If there are already named filters defined they will be displayed in a dropdown list. Select the filter you require and press Execute. The filter will be executed and the results displayed in Panel Manager.
Named filters may also be executed using Filter Manager from the Maintenance menu.
Adding a Named Filter
From the Filter view, with the Named Filter radio button selected, click on Add. The Named Filter dialog will appear and a new named filter can be defined.

In the Filter Name field enter a brief description of the filter. This is the description that will be displayed in the Named Filter dropdown list, and on the Filter Manager screen.
Filter Elements
Elements are another way of grouping conditions within a filter. Each element in a filter can contain one or more conditions.
New filters are created with an element to get you started called ‘Element1’. The element can be renamed if required by clicking on the element name and entering a new name.

To add more elements click on the Add button. To remove elements select the required element by clicking on the checkbox next to its name and click on the Remove button. You can remove more than one element at a time. A filter must contain at least one element.
When a filter has one or more elements, the results of the filter will depend on the Filter Match selected. By default this is set to All Elements, but can be changed by selecting Any Elements from the dropdown list.
| Filter Match | |
| All Elements | The conditions in all elements must be true, i.e. the elements are joined with an AND operator. |
| Any Elements | The conditions in at least one of the elements must be true, i.e. the elements are joined with and OR operator. |
Add Criteria Detail
Click on the + Criteria button within the appropriate element to start adding conditions to the filter. The Criteria Detail dialog will be displayed.
Expand the Profile Variables folder and the folders below to see what variables are available for filtering.

The variables that are available for use in named filters are defined in Hierarchy Manager, which can be found within the Maintenance menu. In order to be available for filtering, each variable in the hierarchy must have the ‘Allowed in Named filters’ checkbox ticked.
Select the variable you require from the appropriate folder to define the new condition. Variables can be selected by expanding the appropriate folders, or by using the search function.
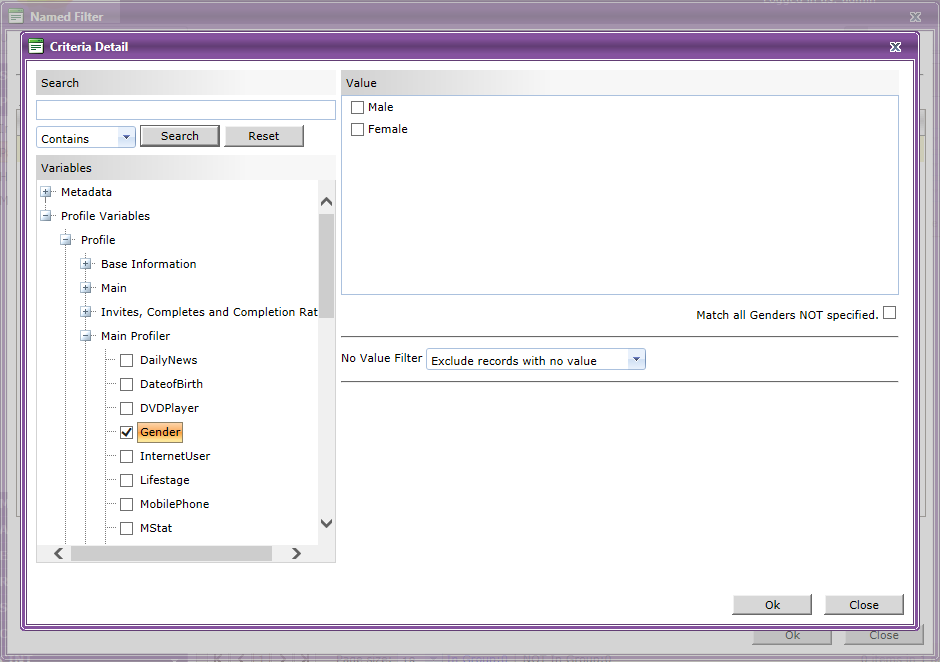
For each condition the required values must be specified and a No Value Filter selected.
Select value/s
Select the values required for the condition. This area of the dialog will show different options depending on the type of variable selected.
Match all Value/s NOT specified
Checking this allows data to be returned that does NOT match the data values specified.
No Value Filter
In addition, a No Value Filter should be selected which defines how to handle data that is NULL (i.e. has no value for the selected column). The default No Value Filter is Exclude results with no value. No Value Filters can be useful to examine missing data.
Variable Hierarchy
In a typical Q_Panel installation there will be a Metadata folder, and a Profile Variables folder containing sub-folders Profile, Contact History, Event History and Email History. The Profile folder contains variables relating to panellists defined in the current database. The Contact History, Event History and Email History folders contain variables relating to the activity of panellists within Q_Panel. The Metadata folder contains the metadata variables, if any are defined in your system.
As Hierarchy Manager allows the customisation of the folder hierarchy, your installation may look different.
Named filters can be created using variables from the Profile folder and ONE of the other folders (Contact History, Event History or Email History). As there is no relationship between Contact History, Event History or Email History, you cannot create a named filter using variables from more than one or these folders.
Note for CrossTab users
It should be noted that when a named filter is executed in Panel Manager it will always return panellists i.e. all filters execute at panellist level. When the same named filter is run in CrossTab it may produce different results if it is executed at a different level. (In CrossTab, queries are only run at panellist level if they contain at least one variable from the Profile folder in either the Row, Column or Filter).
Example 1 - Named Filter
Create a named filter to return only panellists born in 1970 and who have more than 50 reward points.
In this example we will put each condition into a separate element. It is not necessary to do it this way; they could all be grouped under one element.
- Add a Named Filter called "Born in 1970 and more than 50 points".

Element1 is created by default.
- Change the Element name by clicking on Element1 and enter the name "Born in 1970".

- Click on + Criteria to add the first condition.
- Enter the text ‘date’ in the search field and click on Search.
- Select Date of Birth from the Main Profiler folder. (You could also find the Date of Birth variable by expanding folders).

Date criteria are defined in a similar way to that described for sample filters. The main difference is that Virtual Ranges can only be based on the Run Date, which in this case means the date the filter is executed. Although Project Date can also be selected in a virtual range, it just behaves the same as the Run Date and will be the date the filter is executed.
For this example we will use fixed dates.
- Enter the dates as follows, using the Calendar popup button.
- Leave the No Value Filter option at the default value of Exclude records with no value. (Records will not be returned if the Date of Birth has no value i.e. set to NULL).

- Press OK to see how the filter looks so far.

- Add another element called "More than 50 points".
- Perform a search for the Total Reward Points variable. Select it and enter the numeric range 50-
- Press the OK button and see the complete filter definition.

The Filter match dropdown box has been left at the default value of All Elements. This means that the filter will return all panellists who were born in 1970 AND have fifty reward points or more.
- Press OK to save the new named filter.
You will be returned to the Filter view where the filter is selected in the dropdown list ready to be executed.

If the filter is executed the filter results will be returned and displayed as follows (depending on the contents of your database). The additional columns Total Reward Points and Age have been added to the display using the Columns button.

If we edit the filter and change the Filter match dropdown box to Any Elements, the filter will return all panellists who were born in 1970 OR have fifty reward points or more.
Named filters may also be added using Filter Manager from the Maintenance menu.
Example 2 - Named Filter using Contact History
Create a named filter to return only panellists who completed the European Travel Study Top Up survey.
In this example we will put both conditions into the same element. It is not necessary to do it this way; they could be in separate elements.
- Add a Named Filter called "Completed EuropeanTravel Study".
- Click on + Criteria to add the first condition.
- Select Outcome Code from the Contact History folder and select Complete (1).

- Press OK to see how the filter looks so far.

- Add another criteria to the element, selecting the column Project Title from the Contact History folder.
- Find the European Travel Study – Top Up survey by searching the last few years and checking the All Owners box then clicking on Search.

The survey we want is in the Travel prototype folder.
- Expand the Travel prototype folder, select the European Travel Study – Top Up survey and add to the Selected box.

- Press OK to see the complete filter definition.

This filter only has one element so the Filter match dropdown box is irrelevant. All conditions with the element must be true i.e. the filter will return all panellists who completed this survey.
- Press OK to save the new named filter.
You will be returned to the Filter view where the filter is selected in the dropdown list ready to be executed.

If the filter is executed the filter results will be returned and displayed as follows (depending on the contents of your database).

In our example, we can see details of the 116 panellists who have completed this survey.
Select one of the panellists and view their Event History to see it they were rewarded with any points for completing this survey.

Example 3 – Named Filter using Event History
Create a named filter to return only panellists who have claimed a prize in the month of February 2013.
- Add a Named Filter called "February 2013 Prize Claim".
- Click on + Critera to add the first condition.
- Select Event Type from the Event History folder and select the event type Prize claimed (you may need to scroll down to find it).

- Press OK to see how the filter looks so far.

- Add another column to the element, selecting the column Event Date from the Event History folder and enter the fixed range dates for February 2013.

- Press the OK button to see the complete filter definition.

- Press OK to save the new named filter.
You will be returned to the Filter view where the filter is selected in the dropdown list ready to be executed.

If the filter is executed the filter results will be returned and displayed as follows (depending on the contents of your database).

In this example only one panellist is returned. View their Event History to see details of the prize claim.

Note that when creating a named filter using Prize Description, the Event Type of Prize Claimed is also required to ensure that no records are returned for different types of events which have the same reference as the prize selected.
Example 4 – Named Filter using Email History
Create a named filter to return only panellists who were sent the Summer 2014 Newsletter. As an additional condition we will ensure the email completed. (Some of the mailings may have failed or bounced).
- Add a Named Filter called "Sent Summer 2014 Newsletter".
- Click on + Criteria to add the first condition.
- Select Email Batch Name from the Email History folder and select the required email batch – in this case Summer 2014 Newsletter.

- Press OK to see how the filter looks so far.

- Add another column to the same element, selecting the column Email Status from the Email History folder and click on Complete.

- Press the OK button to see the complete filter definition.

- Press OK to save the new named filter.
You will be returned to the Filter view where the filter is selected in the dropdown list ready to be executed.

When the filter is executed the panellists who received the Summer 2014 Newsletter will be returned and displayed in Panel Manager.
Editing a Named Filter
To edit an existing named filter from Panel Manager, select Filter from the toolbar to show the Filter view and select the Named Filter radio button. Use the dropdown list to select the required named filter and press Edit. The Named Filter dialog will be displayed. Expand each element so that all the conditions within can be viewed.
Remove an element or condition by ticking the checkbox next to its name and selecting the Remove button.
Edit an element or condition by clicking on its name.
Named filters may also be edited using Filter Manager from the Maintenance menu.
Deleting a Named Filter
Named Filters can only be deleted using Filter Manager from the Maintenance menu.